Showing posts with label how to. Show all posts

Sunday, February 24, 2013

Hair Factor no2!

 As a complement from the previous article The Hair factor there are some more tips to help all of you who wanna try dye their hair at home .Actually i do for years following those rules and i've never been disappointed by the result!
I have been to the almost extreme...I'm a naturally brunette and i have tried red,bronze,purple red and lately light brown.

As I've said in The Hair factor the tones that suit more to the brunettes are 3,4,5 or 6 ..and to the tones that suit to the naturally blondes usually are 1,2,7 ! But someone might be a naturally blond but looks better in warm tones (such as pink,red,orange yellow) or the opposite ! So she'll have to use a hair colour that has warm tones inside (3,4,5,6)

Extra advise always use a tone..don't use colours without a tone...they are very difficult as colours to look good on you.

Dont think that choosing a hair colour close to your natural will look good! if the tone is wrong it'll make you look pale,or extra pink ,it depends your skin!
first number is colour second is tone and third is secondary tone..0 means that the colour will be more vibrant

Also for you that you are more daring and you wanna use a professional colour! (it mean you will buy the colour and then the peroxide of hydrogen extra) you can do mix-ups.You can take one natural hair colour (1,2,3,4,5,6,7,8,9,10 checkThe Hair factor) and combine it with an other with the same base ( or not but the numbers need to be close for example a 9 and an 8 or a 2 and a3) but the second will have the tone you want! The reason to do that is to be more sure for the result you want! For example I naturally have a hair colour 5.4 (i belong to the warm colours)and I wanted to go for a dark honey-colour so I used an 8 plus a 7.3 !So my base is something in the middle of 8 and 7 and my tone is 3 !


Now the most important think that no colourist wanna share with you a very important factor is the
peroxide of hydrogen ! They have numbers starting from 10-40! 40 is extra dangerous and i would not recommend using it at home ,it is usually used for beached! And now the point of those numbers is...that as many numbers of colour you wanna change if you multiply them with 10 you have the peroxide of hydrogen you need!for example if you have a 6 and you want to go for an 8 you need a peroxide of hydrogen number 20 (8-6=2    2*10=20!) If you have a 6 and you want a 9 then you use a peroxide of hydrogen #30 ,because 9-6=3   3*10=30


 Here are some colour/tones to help you pick colour and tone! Rember always to choose correctly cold or warm!


Have fun! If you follow those tips comment your experience!!!

Saturday, January 26, 2013

How to: Wavy Hair with No Heat - in less than an hour!


Hi all!!! Here is a simple way to get stylish wavy hair – and the whole process takes less than an hour!!! 


Start with freshly washed hair that has been air dried or blow dried (it doesn’t really make a difference). Basically, start with what your hair would look like after you had taken a shower and dried them. Try not to use any products that weigh the hair in addition to what you’ll be using for this styling technique, because it will remove the volume from this look. 

You will need a mousse that will add volume and texture to your hair. A great product that I have personally fallen in love with is the Lorvenn Paris X-Style Super Curl Mousse  


It actually does what it promised to do: maintain the curls and the hair’s natural elasticity and texture without weighing on the hair. The problem with most of the other mousse products I had previously tried was that they would make the hair too stiff without actually holding the style.


One product is all you'll need! If your hair is very dry, you might want to add a moisturizing serum to the ends only. 


Equally spread the mousse all over your hair, making sure to not add too much on the roots, because it might make them oily. You can flip your hair upside down for better control.


 Separate your hair into sections. Depending on the length and thickness of your hair, you can choose to add or remove sections, but I think that separating them into at least four sections (two on the lower part of your hear and two on the top of your head) will add more style as the curls will form differently and your hairstyle will look more layered. 


 Start twisting each section around itself (like in the picture to the left); you can twist the lower sections whichever way you want (towards the face or away) but definitely twist the upper sections away from the face. Also, try to make the upper sections as high as you can (almost at the top of your head) so you can get more volume if you wish to.


After twisting each section, wrap it around itself and secure it in place with an elastic band or a bobby pin. By the end, you should have four little “meatballs” on your head :P


Spray some hairspray on if your hair doesn’t hold curls easily and let your hair sit like this for as long as you can afford, but 45 minutes to an hour is more than enough. The longer you leave it, the tighter the curls will be.


Your sections should look like this...


When ready, untangle each “meatball”, flip over and run your hands through your hair to “open” the curls and make them look more natural. Flip your hair again and style accordingly. I love splitting my hair on the side, because I feel it makes the curls look more elegant and stylish. 


That’s it! You get lovely wavy hair without the use of a heating tools or having to sleep uncomfortably because your hair is wrapped up in something weird :P In order to wear your hair the same way on the next day, simply split it again into the number of sections you had before, repeat the same twisting process and let it sit. Easy, fast and stylish! 


Enjoy ;)


*S

Tuesday, January 22, 2013

Pimple Treatment - The Unexpected Zit


...And then you saw it. It came uninvited, unannounced and most certainly unwanted. The all mighty, annoying and sometimes huge… the unexpected zit. 

Lucky for us people who still have to deal with the unexpected zit even in our adult lives where you would hope that things like Clearasil and pimples would be a thing of the past, beauty science has come up with some effective ways to deal with said zit and maybe only have to bear with it for a quick period of 24 hours.

First of all, I would love to say that the best advice I have would be to not try to pop it, but I never could keep myself from doing so and so I had to find other ways to fix the damage. But, please, if you do decide to pop the zit make sure your hands are clean and you use napkins and not your nails. You will most likely scar your skin if you do.

So, below are three different ways I have found are best in dealing with the unexpected zit.


   Gel: A gel made for spot treating is great if you only want to treat one area. Neutrogena’s Rapid Clear Sore Pimple Gel is my suggestion; you apply a bit of product to cover the infected area, after you’ve cleansed your skin, wait for it to dry and go about your day. It’s best that you use this gel before going to sleep and let it work throughout the night. You will wake up with clear skin or with a much reduced-in-size pimple.


And, of course, this gel contains salicylic acid, which I am convinced by now is the answer to any acne problem. P.s this product is not just suited for sore and red pimples; it works for the ones that look kind of “bumpy” as well.


    Ice: This is a good option for a sore and red pimple because the cold will reduce both the soreness and the redness. After cleansing and toning the skin, take an ice cube and place it on the infected area. Don’t hold it there, lift it from the pimple and place it again. Check to see how your skin is reacting, if it’s hurting too much, don’t try this method. 


    Mask: The last option is to use one of the masks you might already have but instead use it as a spot treatment. Whatever mask you may be using, they all aim to give you the same result: better looking, even skin tone. In my experience, a clay mask is great for this because the way clay works is that it draws the toxins out of the skin. Also, clay as a substance is very drying, so when using it as a mask it would dry and "de-puff" the pimple. Clay also removes oiliness and dirt from the skin so overall it’s a great option for spot treatment.


    You don't have to use a particular type of clay. I have been using a brand with green clay for years now, but white and red clay work just as well!!!
 
    Happy pimple treating ^^

    *S

Sunday, January 20, 2013

How To: Sport the Red Lips!!!


 With oxblood being the new “it” color for this season, there hasn’t been a better time to try out a red lips look! It’s classic, timeless and there is a red for every skin tone! It can also be worn day and night in a variety of ways…


The “Nude-Eyes-Red-Lips” Look:


If you have big eyes that need no accentuation, this is definitely a look for you. Keep in mind when you put the emphasis on one feature, the others might disappear a little, but if your eyes are at the center of attention at all times, then don’t worry. Depending on whether you’re getting ready for a night or day event choose a red that is appropriate. How to choose the right red for you? It’s the same as figuring out which hair color would suit you best!

(here is an older post from our blog to help you figure out which colors suit you best http://thefriendzyzone.blogspot.gr/search?updated-max=2012-11-11T11:18:00-08:00&max-results=3&start=41&by-date=false


However, don’t forget the eyes completely when you decide to try the “Nude-eyes-Red-Lips” look. Put a mate eye shadow base or primer on and add some mascara. This will complete the look but won’t remove the focus from your lovely colored lips!


The “A-Bit-Of-Both” Look:


Let’s say you can never go out without your favorite smoky eye look. Or that your eyes are your smallest feature and they need to be brought out to balance out your face. I have small eyes and I find it hard, even when I’m doing a very simple natural look with just foundation and blush to not add some accentuating eye shadow or mascara to bring out my eyes more. 


By always wearing make up on your eyes, it doesn’t mean that you’re banned from wearing lipstick as well in fear of it becoming “too much”. The key is balance!

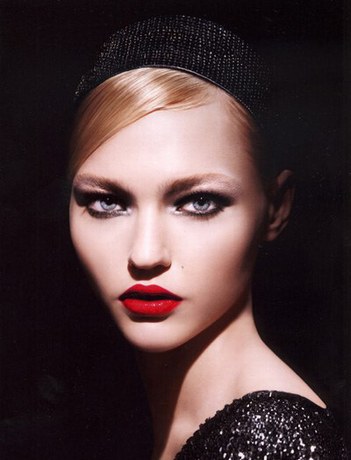
Look at the model.


She has a dark smoky look but also is sporting dark red lips! You can do the same by working with a smoky look and blending very well!!! You can also add bits of white shimmer on the brow bone and inner corners to bot only illuminate and open up your eyes but also break all the dark color of the smoky look. 


The only limitation I would see in this combination is that it’s more a night time look, but you can always tone down the black of the smoky look by using another eye shadow like brown or grey for a softer look, or try a pink toned lipstick and transform it into a day look. Or you can just try out the following tip…


The “Cat-Eye-And-Red-Lips” Look


 This is different from doing a smoky eye and you can see the difference in how it’s worn. I think it’s because it’s more clean and neat than a smoky look that this look can be worn during the day as well. 


You can work with thick and thin lines: thicker lines would work great on smaller eyes with little to no eyelid space or monolids because it would balance out your features and bring out your eyes more, while thinner lines are great for people who have bigger eyes and just want to accentuate and don’t like the nude eyes look. 


This is basically the look that Dita Von Teese made famous through her unique fashion style and burlesque shows. It combines the classic red lip (or a variation of it) with the sexy cat eye liner that can instantly add style!

Whichever you pick, have fun with it and create a beautiful look for your outing!!! 

So, what's your favorite way of wearing red lipstick? ;)


 *S